- Load your video file.
- Under Video choose the video codec, for avi choose xvid and if making mp4 or mkv choose x264
- Under Video->Configure and under Encoding type change to Two Pass Video Size if you want to change the output file size.

- Under Video->Filters->Subtitle add the subtitle filter and load your srt,sub,ass file. (extract subtitles from mkv files using mkvextracgui or ogmdemuxer)
- You might have to downresize the video resolution/frame size, for DVD Divx Player use a resolution under 720x576, for portable devices use the max resolution that it supports, for PS3, Xbox 360 yoú can keep HD resolution(1920x1080 or lower). Under Filters add the Resize filter and resize.
- Under audio choose mp3 for DVD Divx Player playback, aac audio for mp4.
- Set the output format, avi or mp4
- Click Save to start the encoding, save the video with the file extension like video.avi or video.mp4
Tuesday, December 16, 2008
Converting Video
Basic steps to convert almost any video to avi xvid(for DVD Divx Players or portable players) or mp4 h264(for IpoD, PS3, Xbox 360, etc) using avidemux.
Monday, November 17, 2008
Media State: Authentication failed
Network card status reports error Media State: Authentication failed.
In Microsoft Windows Vista, a user reported an error on the network card.
If the domain network is not using a radius connection you may need change the Authentication settings of the network card.
In the properties of the network card click on the Authentication tab and unselect Enable IEEE 802.1x authentication.
Thursday, October 23, 2008
How to Create a Custom Windows Installation DVD - for UMPC
Using the free software vLite, you can create a completely custom, bootable Windows Vista install DVD. Remove the parts of Vista you don’t want/use, change some of the default settings, include Service Packs and Windows Updates, and more. Keep reading for complete step-by-step instructions on using vLite.
Guide for Vlite
http://forum.notebookreview.com/showthread.php?t=271701
Full instructions are available from:
http://www.simplehelp.net/2008/06/04/how-to-create-a-custom-windows-vista-installation-dvd/
Vlite is available from:
http://www.vlite.net/
Guide for Vlite
http://forum.notebookreview.com/showthread.php?t=271701
Full instructions are available from:
http://www.simplehelp.net/2008/06/04/how-to-create-a-custom-windows-vista-installation-dvd/
Vlite is available from:
http://www.vlite.net/
Thursday, October 02, 2008
Wireless Vista machines connecting to a Domain
This specifc case referes to Microsoft Vista workstations and users who are connecting to a Windows radius server, though it will be of use to users who are using other authenticating technicnologies.
The Radius server and workstations require a server certificate, this can be generated by using the SelfSSL obtained from the IIS Resource kit.
How To Install:
The Radius server and workstations require a server certificate, this can be generated by using the SelfSSL obtained from the IIS Resource kit.
How To Install:
- Download IIS 6.0 Resource Kit Tools (requires Windows Server 2003, Windows XP)
- Install the resource kit (If you want hand-holding through these steps, read these instructions with screenshots by Jonathan Maltz)
- From the Windows Start Menu, go to the "\Programs\IIS Resources\SelfSSL" folder and select "SelfSSL".
- Instructions will be listed in a command prompt. Type "selfssl" to run the program.
- Type "y" to confirm overriding/installing the certificate on the given site.
- Test that it worked by visiting https://localhost/.
Additional instructions are available from the following blog.
We are going to manage the wireless connection at the workstations via Microsoft Group Policies.
"Wireless and wired clients running Microsoft® Windows Vista™ or Windows Server 2008 and wired clients running Windows XP with Service Pack 3 support enhancements that can be configured through Group Policy settings that are supported by domain controllers running Windows Server® 2008. To support these enhancements for an Active Directory® directory service environment consisting of domain controllers running Windows Server 2003 or Windows Server 2003 R2, the Active Directory schema must be extended."
Use the following guide to extend the schema:
Active Directory Schema Extensions for Windows Vista Wireless and Wired Group Policy
Edit the Group Policy using Group Policy Management Console.
- Create a Group Policy Object for the computers you want to configure wireless access. (i.e. called Wireless workstation settings)
- Edit the Group Policy Object.
- Expand Computer Configuration, Policies, Windows Settings, Security Settings.
- Select Wireless Network (IEEE 802.11) Policies.
- Click the right hand mouse button, in the right hand window and select Create a new Wireless Policy.
- Enter an appropriate name and description, tick the Use Windows WLAN AutoConfig service for clients.
- Click Add, then select Infrastructure.
- In the Profile name enter an approprate name and the correct SSID
Tick - Connect automatically when this network is in range.
and tick - Connect even if the network is not broadcasting. - Click the Security tab
In Authentication select WPA-Enterprise
Encryption select - TKIP
In Select a network authentication method: select Microsoft: Protected EAP (PEAP)
Click on Properties:
Tick on Validate server certificate
In Trusted Root Certification Authorities - select your certificate. (Ensure it has been installed.)
In Select Authentication Method: select Secured password (EAP-MSCHAP v2)
Click Configure - In When connecting ensure Automatically use my Windows logon... is selected. - Click Ok, click OK on Protected EAP Properties.
In Authentication Mode: select User re-authentication
Max Authentication Failures: is set to 3.
Tick Cache user information.
Click Advanced.
Ensure Enforce advanced 802.1x settings is not selected.
Tick enable Single Sign on
Select Perform immediatly before User Logon
Max delay for connectivity set to 30
Tick Allow additional dialogs to be displayed. Click Ok, click Ok to close Wireless network properties. - In the Network Permissions tab
- Ensure the correct Network Name and network type is set with the permission set to Allow.
- Tick the following - Allow user to view denied networks and Allow everyone to create all user profiles. - then click Ok.
- Add the Group Policy object to the appropriate workstations.
On the workstation you need to install the certificate into the Trusted Root Certificate Authority.
On the workstation load the MMC and load Certificates and install the manually created certificate.
Links:
The Cable Guy - Wireless Group Policy Settings for Windows Vista
Tuesday, September 30, 2008
Acer Aspire One - Linux - installing VLC
The Acer Aspire One (Linux edition) runs a version of Red Hat/Fedora Linux V8.
The built in media player has a limited set of CODECs and so can not play all the available video formats (i.e. Divx & Xvid video formats). You can install the VLC video player which will play a large selection of different types of video files.
Firstly, we need to open up the interface to allow extra software to be added.
- Go to the green Files pane at the bottom right of the screen and left-click on My Documents.
- Now left-click on File & Terminal – you'll see a text window open with a $ prompt.
- Type in xfce-setting-show and press Enter – up pops the Xfce Desktop Manager.
- Left-click on Desktop, then select the Behaviour tab. Now tick Show Desktop Menu on Right Click.
- Type Exit to close a Terminal screen.
Now, if you close all those open windows & get back to the standard Aspire One desktop, you'll find that, if you now do a right-click, you'll get a Menu appear!
Installing the VLC video player.
- Right-Click on the Desktop and select Terminal and type in the following lines at the $ prompt.
nu -
(Your appropriate password)
sudo yum install fedora-release
sudo rpm -ivh http://rpm.livna.org/livna-release-8.rpm
sudo yum install vlc python-vlc mozilla-vlc - When prompted answer Y & Enter, when complete close all open windows.
- Right Click anywhere on the Desktop and go to MultiMedia -> VLC Media Player. (You might need to restart your Netbook.
Adding Icons to the Aspire One
It's all very well having the Advanced Menu, but for some apps you'd also like the fast access provided by the desktop. Here's how you make them appear. Press Alt-F2, type in xterm to open the command line (Terminal) window - and click on Run...
At the command line, type:
sudo mousepad /home/user/.config/xfce4/desktop/group-app.xml and hit Enter. This calls up the desktop's configuration file. Scroll through and you'll see how the entries are arranged.
Add to the Fun desktop section (Possibly
Remembering to select a unique sequence number the number describes the order of the applications.
Save the file then restart your Acer Aspire. Click on the right-arrow button in the Fun section, and you should see a new VLC icon. Drag and drop it higher in the list if you prefer.
Links:
http://www.aspireoneuser.com/
Ten tweaks for a new Acer Aspire One.
Thursday, August 14, 2008
Check the Capabilities of your Processor
SecurAble probes the system's processor to determine the presence, absence and operational status of three modern processor features: .
- 64-bit instruction extensions.
- Hardware support for detecting and preventingthe execution of code in program data areas.
- Hardware support for system resource “virtualization.”
Thursday, May 15, 2008
Network adapter priority in Vista

If you have multiple network cards in your Vista machine it is recommended to configure the wired domain network card as the first in the list.
On the Advanced menu, on Advanced settings, you can change the order which Vista uses different adapters.
To access the Advanced Settings, go to the Network and Sharing center, click Manage Network Connections - 5th down under task on the on the left then press ALT to make the menu appear.
Information and link to: http://blogs.technet.com/jamesone/archive/2007/04/03/network-adapter-priority-in-vista.aspx
Monday, May 12, 2008
Group Policy - preferences
Microsoft's Group Policy preferences includes the ability to control and configure a great deal more, from a central point, than regular Group Policies can. Some preference settings actually overlap with “real” policy settings, but in that case you have a choice between a policy and a preference. So, you might ask: what’s the difference? Well, a “policy” is something you enforce and which cannot be changed by the user – a “preference” is a setting you would prefer the user takes on, but the user can still change it.
Preference can be set to apply only once and from that point in time the user is free to do whatever he/she wants – or to apply every time the Group Policy is refreshed (default ever 90 to 120 minutes on clients).
Preferences can be used to amongst other things, map network drives, manage environmental variables, registry entries, creating folders/files and short cuts.
For a more detailed information: Windowssecurity.com
How to access Group Policy - preferences:
Windows Server 2008 server or a single Windows Vista SP1 with the downloadable, “Remote Server Administration Tools” (RSAT) toolkit installed. RSAT will include GPMC version 2 and updated versions of the administrative tools we had in the “Administration Tools Pack” for earlier Windows Server systems.
Enabling Group Policy, preferences on Client Workstations
To enable client workstations to use Group Policy preferences you need to install Group Policy Preference Client Side Extensions on the workstations.
Group Policy Preference Client Side Extensions are now available for download.
The GPP CSEs are included in Windows Server 2008 RTM, but can now be downloaded for: Windows XP SP2+ (32/64 bit) Windows Server 2003 SP1+ (32/64 bit) Windows Vista RTM+ (32/64 bit)
These are the links:
GPP CSEs for Windows Vista (KB943729)
GPP CSEs for Windows Vista x64 Edition (KB943729)
GPP CSEs for Windows Server 2003 (KB943729)
GPP CSEs for Windows Server 2003 x64 Edition (KB943729)
GPP CSEs for Windows XP (KB943729)
GPP CSEs for Windows XP x64 Edition (KB943729)
Additional information including installing the extension can be obtained from the following blog: heidelbergit
Monday, April 28, 2008
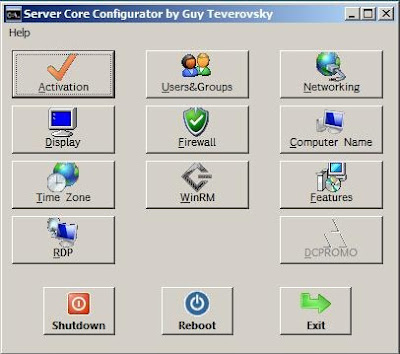
Windows Server Core - CoreConfigurator to the rescue
UPDATED
If you need to configure Server Core to get your installation up and running but you're not a command-line expert then check CoreConfigurator. The download link from this page has now been blocked, click here for the reason.
Guy Teverovsky, Windows Server MVP, comes to rescue with a simple GUI utility to do all the hard work for you.
CoreConfigurator Features:
Use this site for instructional video and download.
http://www.netometer.com/video/tutorials/2008-server-core-dcpromo-coreconfigurator/index.php
If you need to configure Server Core to get your installation up and running but you're not a command-line expert then check CoreConfigurator. The download link from this page has now been blocked, click here for the reason.
Guy Teverovsky, Windows Server MVP, comes to rescue with a simple GUI utility to do all the hard work for you.
CoreConfigurator Features:
- Product Activation
- Configuration of display resolution
- Clock and time zone configuration
- Remote Desktop configuration
- Management of local user accounts (creation, deletion, group membership, passwords)
- Firewall configuration
- WinRM configuration
- IP configuration
- Computer name and domain/workgroup membership
- Installation of Server Core features/roles
Here's a screenshot of the main screen:

Use this site for instructional video and download.
http://www.netometer.com/video/tutorials/2008-server-core-dcpromo-coreconfigurator/index.php
Thursday, February 28, 2008
Microsoft ISA 2006 and Publishing an SSL Website on an internal server
Microsoft IIS Server configuration
- If using manually created Certificates, install Certificate Services on the IIS Server.
- Configure Certificate Services using the internet published Domain name.
- On Web Site Properties and Web Site tab, ensure the site has the correct IP address of the Server and the correct SSL port 443.
- In Directory Security, select Edit under Authentication and access control. In Authentication Methods ensure only Integrated Windows Authentication is selected.
- On the folder and files containing the web site ensure the appropriate user group has Read & Execute (Domain users, Domain Staff etc.) permissions.
- Ensure the web server is setup with a Default Gateway IP address of the ISA sever.
Microsoft ISA Server 2006 configuration
1. Import the SSL Certificate onto the ISA Server that was created on the IIS Server.
2. Publish a secure web site with Microsoft ISA 2006.
3. Ensure the sections of the published secure web site firewall policy rule are:
- General tab – name and enabled.
- Action tab – Allowed and Log requests matching this rule.
- From tab – the traffic from these sources – Anywhere.
- To tab – published site – The public domain name of the site. (The public domain name is registered to the internal IP address of web site by the HOSTS file. – see later in the guide.)
Forward the original host header and also select Requests appear to come from the ISA Server. - Traffic tab – The following protocol should be HTTPS, do not select Require 128-bit encryption and Require SSL Client Certificate.
- Listener tab – Select Properties
i. Networks tab – External selected (All IP Addresses)
ii. Connections tab – only Enable SSL (HTTPS) on port 443
Leave Advanced setting to default – unlimited.
iii. Certificates tab – Use a single certificate for this Web Listener and select the correct Certificate.
iv. Authentication tab – client Authentication method select HTML Form Authentication and Authentication Validation Method as Windows (Active Directory)
Click Advanced – select Require all users to authenticate, SSL Client Certificate timeout – 300s and Validate credentials every – 300s.
Select the correct Domain Name.
v. Forms tab – Deselect Use customized HTML forms, in Display the HTML form in this language select Match user browser settings, deselect both password management settings. Click Advanced.Leave the defaults.
vi. SSO tab – Do not enable Single Sign On. - Public Name tab – This rule applies to: select Requests for the following Web sites.
In the Web site box enter in the public domain name. - Paths tab – External Path should be
, Internal Path should be /* - Authentication Delegation tab – select NTLM authentication.
- Application Settings tab – do not select Use customized HTML forms, in Logon type provided to the Exchange server – select As selected by user (public or private.)
- Bridging tab – Ensure Web server is selected and Redirect requests to SSL port: 443.
- Users tab – ensure the user set is All Authenticated Users is selected.
- Schedule tab – the schedule should be Always.
- Link Translation tab – do not select Apply link translation to this rule.
4. In the Network configuration – Web Chaining, setup a bypass rule to retrieve requests directly from the specified destination. In the To tab add in the Internal Domain Name and website IP address.
5. Edit the ISA servers HOSTS file (C:\WINDOWS\system32\drivers\etc\hosts)Add a line at the bottom with the Internal IP address of the IIS Web server and the host name of the publicly registered domain name. (This is the public domain name that the ISA publishing rule uses.) – You may need to repair the network connection, or restart the server.
Wednesday, February 27, 2008
Ubuntu – Linux installation
Installing Ubuntu 7.10 on a Toshiba Portege A100 laptop
Installation seized / locked up:
Selected F6 from the boot menu
Then added:
noapic nolapic
Then pressed enter to continue installation.
https://help.ubuntu.com/community/BootOptions
VMWare Tools
https://help.ubuntu.com/community/VMware/Tools
Installation seized / locked up:
Selected F6 from the boot menu
Then added:
noapic nolapic
Then pressed enter to continue installation.
https://help.ubuntu.com/community/BootOptions
VMWare Tools
https://help.ubuntu.com/community/VMware/Tools
Sunday, February 17, 2008
Windows PE 2.0 and a USB flash drive
Windows PE is a version of the Windows OS that runs without installation entirely in memory (no harddisk required) and boots from a cd-rom or the network
Getting started
Download and install the Windows Automated Installation Kit (WAIK) it is available as a download. It's a big download. Burn it to a cd or mount it using some ISO/IMG mounting tool and install it.
The Windows PE Tools Command Prompt
Open up the Windows PE Tools Command Prompt from the Start Menu and make sure to Run as Administrator: (Run as Administrator is only required on Windows Vista and Windows Server 2008)
Alternatively, you can change the shortcut's properties, Advanced..., Run as Administrator to run it everytime elevated as an administrator.
Building your Windows PE
In order to build your custom Windows PE, follow the next steps:
- Run copype.cmd as follows: copype.cmd x86 d:\winpe_x86
This makes a copy of the Windows PE files to the specified folder. Alternatively, you can specify amd64 for 64-bit machines. - You can customize the Windows PE image (using the Windows Imaging Format, (WIM)) using ImageX:You can mount a WIM file to a folder using the following command:
imagex /mountrw d:\winpe_x86\winpe.wim 1 d:\winpe_x86\mount
This works through a file system driver called WimFltr (see sc queryex WimFltr). - Add all apps you like to add to the image in the mounted folder. Windows PE is based on packages that can be added to the image at will. This is done through peimg, using: peimg /list /image=d:\winpe_x86\mount\Windows
to show a list of all images.
Next, you can add packages by using the command:
peimg /install=packaged:\winpe_x86\mount\Windows
where package is either * (all packages) or one from the list shown by invoking peimg with the /list switch.
The packages are :
WinPE-HTA-Package = HTML Application support
WinPE-MDAC-Package = Microsoft Data Access Component support
WinPE-Scripting-Package = Scripting (VBS, WSH) Support
WinPE-WMI-Package = Windows Management Instrumentation Support
WinPE-XML-Package = Microsoft XML (MSXML) parser support - To copy various deployment tools into the Windows PE image, type:
xcopy "C:\Program files\Windows AIK\Tools\x86\*.*" "D:\WinPE_x86\Mount\Program Files\Tools" /s
and then press ENTER.
When prompted about a file or directory name, type D.
Or other tools type XCopy “C:\Tools\*.*” “D:\WinPE_x86\Mount\Tools” /s, and then press ENTER. When prompted about a file or directory name, type D.
You could add drivers and language packs as well, please see the notes lower in this blog or the help documentation that comes with the WAIK. - When you're done with the image customization, run peimg with the prep switch: peimg /prep d:\winpe_x86\mount\Windows
and unmount the image using ImageX:
imagex /unmount d:\winpe_x86\mount /commit
and copy the created .wim file to the ISO folder:
copy d:\winpe_x86\winpe.wim d:\winpe_x86\ISO\sources\boot.wim
Answering Y to agree to the file being overwritten.
Create a bootable Windows PE ISO Image
You can create an ISO file for the image using oscdimg:
oscdimg -n -bd:\winpe_x86\etfsboot.com d:\winpe_x86\ISO d:\winpe_x86\winpe_x86.iso
where the -b flag specifies the El Torito boot sector for the ISO to be created. It just takes a few seconds to complete.
Create a Bootable Windows PE USB Flash disk
Finally, it's time to put the whole thing on a USB Flash key or to burn the ISO created in the previous step to a cd-rom. Open up diskpart and execute the following commands.
WARNING! Make sure to select the right disk in step 1; you can view all disks using the "list disk" command. In the steps below, all data from the USB Flash disk will be removed!
This is completed from a computer running Windows Vista. Windows Server 2003 version of diskpart does not display flash memory drives.
1. select disk 1
2. clean
3. create partition primary
4. select partition 1
5. active
6. format fs=fat32
7. assign
8. exit
Now copy to the d:\winpe_x86\ISO folder contents to the USB disk (which I assume has letter E: assigned)
xcopy d:\winpe_x86\ISO\*.* E: /e /h
Now you should be able to boot from the USB Flash disk. Make sure to select the right boot device during the boot cycle or to change the boot order in your computer's BIOS.
NOTES:
- Shutting down Windows PE - use wpeutil shutdown.
- Adding a driver
drvload.exe x:\lan\atl01_xp.inf
Online - the drvload.exe command allows the driver to load after starting WindowsPE. Ideal for rarely used drivers.
peimg /inf=c:\lan\atl01_xp.inf D:\WinPE_x86\Windows
Offline - the peimg /inf command for adding a driver in the image. Suitable for frequently used devices, e.g. network card. Only specifying the path to the folder is not sufficient, but you have to enter the full name of the driver file (if you do not do this, the erorr 0x80070002 will appear) # - Change the language and location settings.
The standard image has the QWERTY keyboard layout. Go back to step 2 to mount and do the following on the mounted image using intlcfg:
intlcfg -inputlocale:-image:d:\winpe_x86\mount
intlcfg -syslocale:-image:d:\winpe_x86\mount
intlcfg -userlocale:-image:d:\winpe_x86\mount
whereis replaced by the locale you want (e.g. nl-be for Belgian Period keyboard).
Links:
- Update from technet - http://technet2.microsoft.com/WindowsVista/en/library/08629d0b-56b0-4194-9782-88d01a488ae01033.mspx?mfr=true
- Imagex - http://technet2.microsoft.com/WindowsVista/en/library/bb068119-1ba6-48c7-9ad7-3ed3f72592e91033.mspx?mfr=true
- Peimg - http://technet2.microsoft.com/WindowsVista/en/library/45563a61-155e-48a5-a833-b6cd5119ad4c1033.mspx?mfr=true
- Oscdimg - http://technet2.microsoft.com/WindowsVista/en/library/1d0b11f9-c0c7-4b9a-a17e-77e60d5c1d9a1033.mspx?mfr=true
Thursday, January 24, 2008
Blank page or page cannot be displayed when you view SSL sites through ISA Server
SUMMARY
If Microsoft Internet Explorer is configured to reference a server that is running Microsoft Internet Security and Acceleration (ISA) Server as a Web proxy server, when you try to view a Secure Sockets Layer (SSL) Web site on the Internet by using a port other than 443, a blank page may appear with "Page cannot be displayed" in the title bar. Or, you may receive the following error message:
Page cannot be displayed
For ISA Server 2000
The following Visual Basic Scripting Edition script (VBScript) is an example of how to add ports to the tunnel port range:
set isa=CreateObject("FPC.Root")
set tprange=isa.Arrays.GetContainingArray.ArrayPolicy.WebProxy.TunnelPortRanges
set tmp=tprange.AddRange("SSL 84443", 8443, 8443)
tprange.Save
Restart the Microsoft ISA Server Control service after you run the script.
For ISA Server 2004
Displaying the Existing Tunnel Port Ranges
The Microsoft Visual Basic® Scripting Edition (VBScript) code in ShowTPRanges.vbs retrieves the collection of tunnel port ranges defined in the containing array, iterates through the collection, and displays the names and port ranges for the tunnel port ranges. This script must be run on an ISA Server 2004 computer with the Microsoft Firewall service installed, but it can be modified to run on a remote management computer.
Usage: CScript ShowTPRanges.vbs
Script Listing: ShowTPRanges.vbs
' Copyright (c) Microsoft Corporation. All rights reserved.
' THIS CODE IS MADE AVAILABLE AS IS, WITHOUT WARRANTY OF ANY KIND. THE ENTIRE
' RISK OF THE USE OR THE RESULTS FROM THE USE OF THIS CODE REMAINS WITH THE
' USER. USE AND REDISTRIBUTION OF THIS CODE, WITH OR WITHOUT MODIFICATION, IS
' HEREBY PERMITTED.
' This script retrieves the collection of tunnel port ranges defined in the
' containing array, iterates through the collection, and displays the names
' and port ranges for the tunnel port ranges.
Sub ShowTPRanges()
' Create the root object.
Dim root ' The FPCLib.FPC root object
Set root = CreateObject("FPC.Root")
' Declare the other objects needed.
Dim isaArray ' An FPCArray object
Dim tpRanges ' An FPCTunnelPortRanges collection
Dim tpRange ' An FPCTunnelPortRange object
' Get references to the array object
' and the collection of tunnel port ranges.
Set isaArray = root.GetContainingArray()
Set tpRanges = isaArray.ArrayPolicy.WebProxy.TunnelPortRanges
' If at least one tunnel port range is defined in the
' collection, display the names and port ranges for all
' the tunnel port ranges.
If tpRanges.Count > 0 Then
For Each tpRange In tpRanges
WScript.Echo tpRange.Name & ": " & tpRange.TunnelLowPort & _ "-" & tpRange.TunnelHighPort
Next
Else
WScript.Echo "No tunnel port ranges are defined."
End If
End Sub
ShowTPRanges
Creating a New Tunnel Port Range
The VBScript code in AddTPRange.vbs includes a subprocedure that creates a new tunnel port range containing a single user-specified port to allow clients to send requests, for example, SSL requests, to that port. This script must be run on an ISA Server 2004 computer with the Microsoft Firewall service installed, but it can be modified to run on a remote management computer.
Usage:
[CScript] AddTPRange.vbs RangeName TunnelPort
RangeName specifies the name of the new tunnel port range.
TunnelPort specifies the single port to be included in the new tunnel port range.
Example: CScript AddTPRange.vbs "SSL 8443" 8443
Note that the fResetRequiredServices parameter is set to True to restart the Firewall service.
Script Listing: AddTPRange.vbs
' Copyright (c) Microsoft Corporation. All rights reserved.
' THIS CODE IS MADE AVAILABLE AS IS, WITHOUT WARRANTY OF ANY KIND. THE ENTIRE
' RISK OF THE USE OR THE RESULTS FROM THE USE OF THIS CODE REMAINS WITH THE
' USER. USE AND REDISTRIBUTION OF THIS CODE, WITH OR WITHOUT MODIFICATION, IS
' HEREBY PERMITTED.
' This script creates a new tunnel port range containing a single user-specified
' port to allow clients to send requests, for example, SSL requests, to that
' port.
' This script can be run from a command prompt by entering the
' following command:
' CScript AddTPRange.vbs RangeName PortNumber
Option Explicit
' Define the constants needed.
Const Error_TypeMismatch = &HD
Const Error_AlreadyExists = &H800700B7
Const Error_OutOfRange = &H80070057
Main(WScript.Arguments)
Sub Main(args)
If(args.Count <> 2) Then
Usage()
Else
AddTPRange args(0), args(1)
End If
End Sub
Sub AddTPRange(newRangeName, newTunnelPort)
' Create the root object.
Dim root ' The FPCLib.FPC root object
Set root = CreateObject("FPC.Root")
'Declare the other objects needed.
Dim isaArray ' An ISA Server array object
Dim tpRanges ' An FPCTunnelPortRanges collection
Dim newRange ' An FPCTunnelPortRange object
Dim port ' An Integer
' Get a reference to the array and to
' the collection of tunnel port ranges.
Set isaArray = root.GetContainingArray()
Set tpRanges = isaArray.ArrayPolicy.WebProxy.TunnelPortRanges
' Create a new tunnel port range.
On Error Resume Next
port = CDbl(newTunnelPort)
If Err.Number = Error_TypeMismatch Then
WScript.Echo "A number must be entered for the port to be included."
WScript.Quit
End If
Err.Clear
Set newRange = tpRanges.AddRange(newRangeName, port, port)
If Err.Number = Error_AlreadyExists Then
WScript.Echo "A port range with the name specified already exists."
WScript.Quit
ElseIf Err.Number = Error_OutOfRange Then
WScript.Echo "The range of permissible ports is from 1 through 65535."
WScript.Quit
End If
On Error GoTo 0
' Save the changes to the collection of tunnel port ranges
' with fResetRequiredServices set to True to restart the Firewall service.
tpRanges.Save True
WScript.Echo "Done!"
End Sub
Sub Usage()
WScript.Echo "Usage:" & VbCrLf _
& " " & WScript.ScriptName & " RangeName TunnelPort" & VbCrLf _
& "" & VbCrLf _
& " RangeName - Name of the tunnel port range to be added" & VbCrLf _
& " TunnelPort - Port to be included in the new tunnel port range"
WScript.Quit
End Sub
Deleting a Tunnel Port Range
The VBScript code in DelTPRange.vbs includes a subprocedure that deletes the tunnel port range having the name specified by the user. This script must be run on an ISA Server 2004 computer with the Microsoft Firewall service installed, but it can be modified to run on a remote management computer.
Usage:
[CScript] DelTPRange.vbs RangeName
RangeName specifies the name of the new tunnel port range to be deleted.
Example:
CScript DelTPRange.vbs "SSL 8443"
To delete the tunnel port range with the name specified by the user
Note that the fResetRequiredServices parameter is set to True to restart the Firewall service.
Script Listing: DelTPRange.vbs
' Copyright (c) Microsoft Corporation. All rights reserved.
' THIS CODE IS MADE AVAILABLE AS IS, WITHOUT WARRANTY OF ANY KIND. THE ENTIRE
' RISK OF THE USE OR THE RESULTS FROM THE USE OF THIS CODE REMAINS WITH THE
' USER. USE AND REDISTRIBUTION OF THIS CODE, WITH OR WITHOUT MODIFICATION, IS
' HEREBY PERMITTED.
' This script deletes the specified tunnel port range.
' This script can be run from a command prompt by entering the
' following command:
' CScript DelTPRange.vbs RangeName
Option Explicit
' Define the constant needed.
const Error_FileNotFound = &H80070002
Main(WScript.Arguments)
Sub Main(args)
If(args.Count <> 1) Then
Usage()
Else
DelTPRange args(0)
End If
End Sub
Sub DelTPRange(rangeName)
' Create the root object.
Dim root ' The FPCLib.FPC root object
Set root = CreateObject("FPC.Root")
'Declare the other objects needed.
Dim isaArray ' An ISA Server array object
Dim tpRanges ' An FPCTunnelPortRanges collection
' Get a reference to the array and to
' the collection of tunnel port ranges.
Set isaArray = root.GetContainingArray()
Set tpRanges = isaArray.ArrayPolicy.WebProxy.TunnelPortRanges
' Delete the specified tunnel port range.
On Error Resume Next
tpRanges.Remove(rangeName)
If Err.Number = Error_FileNotFound Then
WScript.Echo "The tunnel port range specified could not be found."
WScript.Quit
Else
WScript.Echo "Removing the tunnel port range specified ..."
End If
On Error GoTo 0
' Save the changes to the collection of tunnel port ranges
' with fResetRequiredServices set to True to restart the Firewall service.
tpRanges.Save True
WScript.Echo "Done!"
End Sub
Sub Usage()
WScript.Echo "Usage:" & VbCrLf _
& " " & WScript.ScriptName & " RangeName" & VbCrLf _
& "" & VbCrLf _
& " RangeName - Name of the tunnel port range to be deleted"
WScript.Quit
End Sub
Links to detailed information:
http://support.microsoft.com/kb/283284/en-us
http://www.microsoft.com/technet/isa/2004/plan/managingtunnelports.mspx
Monday, January 21, 2008
Help and Support service not running
When I go into Manage Your Server and then click on 'More Tools', it gives me an error message.
It says that Windows cannot open Help and Support because a system service is not running.
It says to fix the problem, start the service named 'Help and Support'. When I go into Services, there is no such service name listed.
Answer:
How to add Help and Support service back into Service Manager
It says that Windows cannot open Help and Support because a system service is not running.
It says to fix the problem, start the service named 'Help and Support'. When I go into Services, there is no such service name listed.
Answer:
How to add Help and Support service back into Service Manager
- Open a command prompt.
- Navigate to %windir%\PCHealth\HelpCtr\Binaries
- Run “start /w helpsvc /svchost netsvcs /regserver /install”
- Once this command completes the Help and Support service should now appear in services.msc
- Start the Help and Support service
Subscribe to:
Posts (Atom)